无盘linux配置
Some networks require multiple systems with the same
The following steps are necessary to
-
Install Red Hat Enterprise Linux on a system so that the files can be copied to the NFS server. (Refer to the Red Hat Enterprise Linux Installation Guide for details.) Any software to be used on the clients must be installed on this system and the busybox-anaconda package must be installed.
-
Create a directory on the NFS server to contain the diskless environment such as /diskless/i386/RHEL4-AS/. For example:
mkdir -p /diskless/i386/RHEL4-AS/
This directory is referred to as the diskless directory.
-
Create a subdirectory of this directory named root/:
mkdir -p /diskless/i386/RHEL4-AS/root/
-
Copy Red Hat Enterprise Linux from the client system to the server using rsync. For example:
rsync -a -e ssh installed-system.example.com:/ /diskless/i386/RHEL4-AS/root/
The length of this operation depends on the network connection speed as well as the size of the file system on the installed system. Depending on these factors, this operation may take a while.
-
Start the tftp server as discussed in Section 4.1 Start the tftp Server.
-
Configure the DHCP server as discussed in Section 4.2 Configuring the DHCP Server.
-
Finish creating the diskless environment as discussed in Section 4.4 Finish Configuring the Diskless Environment.
-
Configure the diskless clients as discussed in Section 4.5 Adding Hosts.
-
Configure each diskless client to boot via PXE and boot them.
1. Start the tftp Server
On the DHCP server, verify that the tftp-server package is installed with the
tftp is an xinetd-based service; start it with the following
/sbin/chkconfig --level 345 xinetd on /sbin/chkconfig --level 345 tftp on |
These commands configure the tftp and xinetd services to immediately turn on and also configure them to start at boot time in runlevels 3, 4, and 5.
2. Configuring the DHCP Server
If a DHCP server does not already exist on the network,
allow booting; allow |
where <next-server> option should be replaced with the
3. Configuring the NFS Server
The shared read-only part of the operating system is shared via NFS.
Configure NFS to export the root/ and snapshot/ directories by adding them to /etc/exports. For example:
/diskless/i386/RHEL4-AS/root/ *(ro,sync,no_root_squash) /diskless/i386/RHEL4-AS/snapshot/ *(rw,sync,no_root_squash) |
Replace * with one of the hostname formats discussed in Section 22.3.2 Hostname Formats. Make the hostname declaration as specific as possible, so unwanted systems can not access the NFS mount.
If the NFS service is not running, start it:
service nfs start |
If the NFS service is already running, reload the configuration file:
service nfs reload |
4. Finish Configuring the Diskless Environment
To use the graphical version of the Network Booting Tool, you must be running the X Window System, have root privileges, and have the system-config-netboot RPM package installed. To start the Network Booting Tool from the desktop, go to Applications (the main menu on the panel) => System Settings => Server Settings => Network Booting Service. or, type the command system-config-netboot at a shell prompt (for example, in an XTerm or a GNOME terminal).
If starting the Network Booting Tool for the first time, select Diskless from the First Time Druid. Otherwise, select Configure => Diskless from the pull-down menu, and then click Add.
A wizard appears to step you through the process:
-
Click Forward on the first page.
-
On the Diskless Identifier page, enter a Name and Description for the diskless environment. Click Forward.
-
Enter the IP address or domain name of the NFS server configured in Section 4.3 Configuring the NFS Server as well as the directory exported as the diskless environment. Click Forward.
-
The kernel versions installed in the diskless environment are listed. Select the kernel version to boot on the diskless system.
-
Click Apply to finish the configuration.
After clicking Apply, the diskless kernel and image file are created based on the kernel selected. They are copied to the PXE boot directory /tftpboot/linux-install/<os-identifier>/. The directory snapshot/ is created in the same directory as the root/ directory (for example, /diskless/i386/RHEL4-AS/snapshot/) with a file called files in it. This file contains a list of files and directories that must be read/write for each diskless system. Do not modify this file. If additional entries must be added to the list, create a files.custom file in the same directory as the files file, and add each additional file or directory on a separate line.
5. Adding Hosts
Each diskless
After completing the steps in Section 4.4 Finish Configuring the Diskless Environment, a window appears to allow
-
Hostname or
IP Address /Subnet – Specify the hostname or IP address of a system to add it as ahost for the diskless environment. Enter a subnet to specify a group of systems. -
Operating System – Select the diskless environment for the host or subnet of hosts.
-
Serial Console – Select this checkbox to perform a serial installation.
-
Snapshot name – Provide a subdirectory name to be used to store all of the read/write content for the host.
-
Ethernet – Select the Ethernet device on the host to use to mount the diskless environment. If the host only has one Ethernet card, select eth0.
Ignore the Kickstart File option. It is only used for PXE installations.
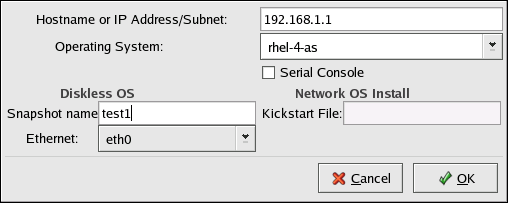
Figure 4-1. Add Diskless Host
In the existing snapshot/ directory in the diskless directory, a subdirectory is created with the Snapshot name specified as the file name. Then, all of the files listed in snapshot/files and snapshot/files.custom are copied copy from the root/ directory to this new directory.
6. Booting the Hosts
Consult the documentation for your PXE card to configure the
When the diskless client boots, it mounts the remote root/ directory in the diskless directory as read-only. It also mounts its individual snapshot directory as read/write. Then it mounts all the files and directories in the files and files.custom files using the mount -o bind over the read-only diskless directory to allow applications to write to the root directory of the diskless environment if they need to.